From Land“Sketch” to Land“Scape!”
A “How To” on how CCUA uses Google Slides on a Windows PC to plan and create native landscapes so you can too!
CCUA has spent the past 5 years completely transforming Columbia’s Agriculture Park from a retired fair ground to an edible “Foodscape” and Missouri natives paradise! Featuring 40+ individual fruit and nut trees (both natives and non native edibles) perennial shrubs, berry brambles, herbs, and winding gravel paths it’s hard to imagine how it all got started.
The answer is multi faceted, but having the right tools and organizational knowledge makes a HUGE difference when you are trying to transform your yard or garden space. It still takes hard work and research, but planning is half the battle, so let’s get started showing YOU how to use Google Slides to start planning!
No matter how you want to transform your space Google Slides is good for designing landscapes in general. Why design your space with natives in mind? They serve a wide range of supportive roles such as attracting pollinators and predator insects and boosting soil health.
It's easy, it's free, and all you need is a Google account! (Psst! If you have Gmail, you already have a Google account)
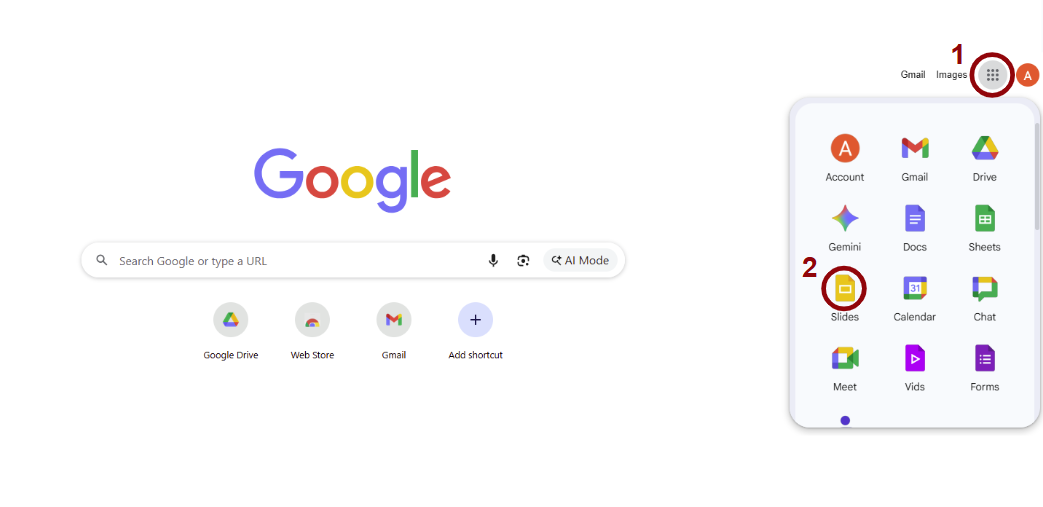
1. Open Google Slides
Navigate to your Google apps. From Gmail or the Google home page, click on the 9 dot square icon on the upper right, also known as the “waffle” button. Click on this and then several icons for Google apps should appear. Click on Google Slides.
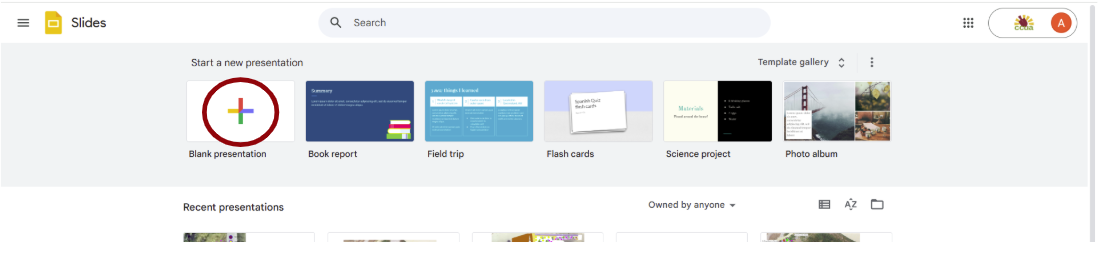
2. Click on start a new presentation
Delete the two text boxes that are on the slide by right clicking on the border of the box then selecting ‘Delete’, or pressing backspace on your keyboard. Now you have an empty slide to work with.
3. Open Google Maps and navigate to your space
Click in the layers box in the lower left and select the satellite layer.

2. If the space you are designing has an object or landmarks visible in Google Maps with a known length, that can be helpful to use as a size reference for the circles that will represent your plants.
3. While in Google Maps you may find the "measure distance" tool helpful. Right click at a point on the map you want to measure from and select measure distance from the menu. Then click a second point and it will tell you the distance between the two.


Knowing distances such as this can help you plan out distances for your plant spacing as well as the necessary distance from other objects such as structures that might create shade!
4. Open up either "Snipping Tool" or "Snip & Sketch" (both are free and one is usually pre-installed on a Windows PC) Select "New Snip" in the tool.
Click and drag your cursor to select your space and create an image of it. Select ‘Copy’ then open your Google Slides, right click and select ‘Paste’ to insert the image to your slide.
Click and drag the corner of the image to increase its size. Note: don't drag the image from the sides as it will alter the proportions of the image - only adjust it by dragging the corners.

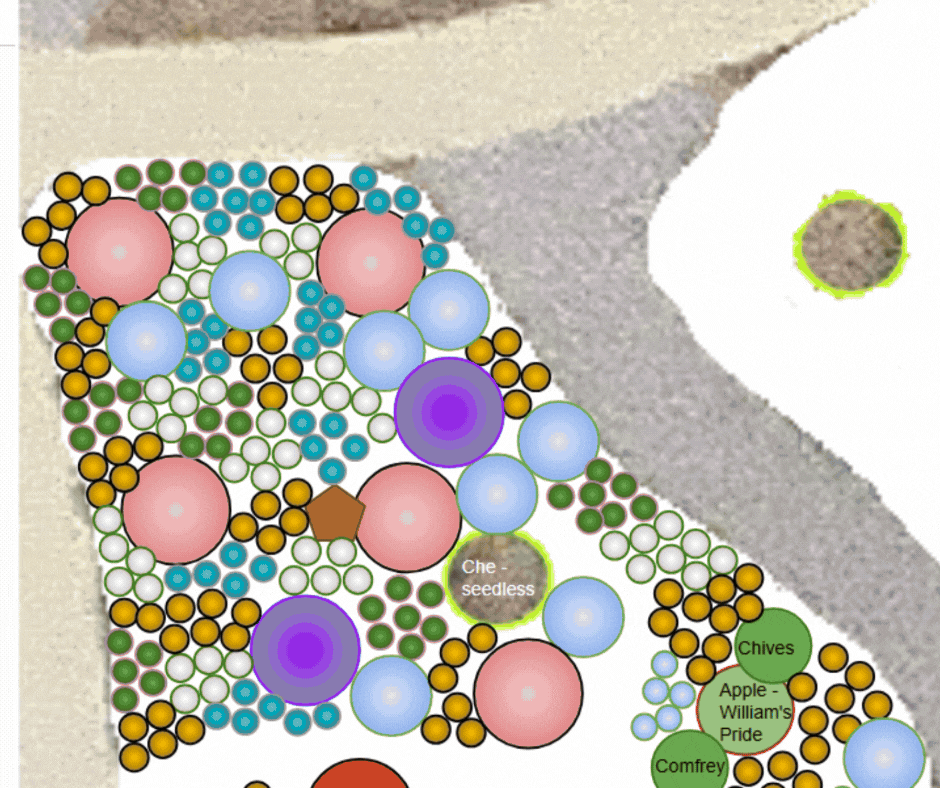
3. You can create a boundary around your garden space by clicking the down arrow next to the line icon and selecting either "curve" or "polyline". Then click several points along the border of your space, closing the outline at the end by clicking the first spot again. If you want to see the satellite image within the outline, click on the shape, select the paint bucket icon in the top bar and change the shape’s fill color to transparent.

4. Create a scale so the circles representing your plants will be appropriately sized. In our case, we know the sidewalk is 6 feet across so we can base our sizes off of that.
Click on the "Shape" button at the top of the screen and select "rectangle" from the options.
Click and drag to create a rectangle going across the sidewalk.
Next, create a rectangle that goes from one edge of the sidewalk to the midpoint. This is 3 feet. Now create 3 more equally sized rectangles that add up to the length of the 3 foot rectangle - these are each approximately 1 foot.
Now you can use the width of the rectangles as a guide to create circles with the appropriate size. In our design, we have a mixture of 1 foot and 2 foot diameter spacings for our plants.

5. Choose sizes and colors for your circles to represent each plant species.
You can adjust the fill color, border color and border thickness for each plant. We like to choose the transparent circle option for trees so we can place plants on the plan underneath their canopy.
You can label each circle to create a key by creating a text box and adjusting the font size in the box.
Use the copy/paste function to duplicate your circles and begin to place them around your design space.

6. Last, but not least, it’s time to plan what you want to grow!
When designing wildflower garden spaces we consider things like light and moisture needs, bloom time and bloom color, height and width of plants, and use of plants.
Grow Native! is a great resource and has several good blueprints for native wildflower gardens here!
Happy Gardening!
Reach out to us at Info@ColumbiaUrbanAg.org for any questions and check back frequently to our “Events” tab on our website where we will share any upcoming hands-on workshops and learning opportunities such as our seasonal “Drop-in Garden Club”