Water You Supposed to do About it?
CCUA’s guide to irrigating your garden!
You can also check out our YouTube video on “Garden Watering Systems,” part of our “Farm Your Yard” Video series!
What is it?
After coaching many home gardeners, the most common mistake we see folks making is in regards to irrigation. What is irrigation? Irrigation refers to the watering of plants by artificial means (i.e. not rain) to promote plant growth. Don’t know the best way to water your garden? Don’t fret! We’ll go over some of your options and weigh the pros and cons of each!
Overwatering
Most people are very concerned that they will over-water their garden…and rightfully so! Our first foray into the plant-grower life is often with houseplants that are easily overwatered. This fear is amplified by observations in our natural world. If we have a week with 7-10” of rain, especially after a long period without rainfall, the rainwater will take longer to percolate (move down) into the subsoil of even a typically well-drained soil and that could leave you with garden plants drowning in a soupy mess. If you haven’t incorporated compost into your in-ground beds, what are you waiting for?! When mixed with clay-rich native soil, compost improves the texture and increases the water holding capacity of the soil. If your in-ground garden beds have already had compost incorporated into them and you’re frequently experiencing soupy conditions, raised beds would be a good idea.
Underwatering
More often than not, gardeners tend to under-water their garden. They get used to not having to water much in the spring when rain is plentiful. Then, the longer days and more direct sunlight of summer leads to increased evaporation (liquid water turning into water vapor) & evapotranspiration (evaporation from the leaf!) If you’re growing in containers rather than in the ground, you’re even more at risk of underwatering because pots dry out much faster than the native soil. TIP: If your garden plant leaves are looking droopy or you’re simply not seeing significant growth in your garden plants, you’re probably under-watering.
Making a Plan!
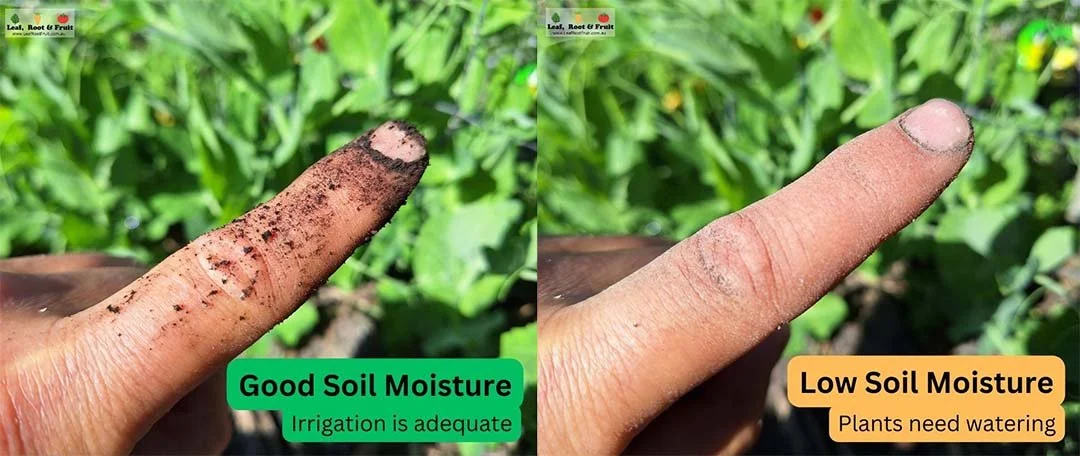
So what do we do about this? Well, first off, you need to be in the habit of regularly checking on your garden. Ideally, you’d go out each morning or early evening and check the appearance of the plants and perform what we like to call “The Finger Test.” It is mostly what it sounds! Take your index finger and stick it into the soil near your garden plants. Your finger should be at least up to the second knuckle. Does the soil feel cold and wet? If not, you need to water!
Now that you know that you need to water more, how should you go about that? There are many options!
Hand Watering
The irrigation method that most folks start with is hand-watering. All it requires is a hose and a hose nozzle so it is definitely the most cost-effective way to get water to your garden!
Hose with attachment-The drawbacks are that you’re more likely to under-water because you have to physically stand there and hold the nozzle. How patient are you?
Overhead watering- (i.e. getting water on the leaves rather than just the soil) but it puts your garden plants at risk of diseases, such as powdery mildew.
Sprinklers- Similarly cost-effective when compared to hand-watering (if you go with the basic oscillating sprinkler) and you don’t have to actively be there for it to work. The oscillating sprinklers are a good option if you have a very square/rectangular area to water and your garden isn’t very large. If your garden is odd-shaped, a super-customizable sprinkler such as the Gilmour Sled Base Impact Sprinkler would be a good choice. Other sprinkler options include:
Spike base
Tripod base impulse sprinklers
Rotor sprinklers, which are great for watering a circular area.
Unfortunately, sprinklers run into the same disease problem as hand-watering because water is getting on the leaves rather than just the soil.
The recommendation we are leading to is that while no method is wrong or bad, it is much more efficient to focus on irrigation that waters the soil, rather than the leaves!
Soaker Hose
Soaker hoses are a good option for irrigating a small garden. You can convert a standard garden hose into a soaker hose by drilling very small holes throughout the length of the hose. Don’t have an old hose laying around that you wouldn’t mind drilling holes into? That’s okay! There are plenty of commercially available soaker hoses to choose from at any garden center. They generally come in two different forms: soft-bodied and hard-bodied. In our experience, the soft-bodied soaker hoses (that lay flat when there’s no water) last a lot longer than the hard-bodied soaker hoses which tend to crack and bust after a year. However, if you have a large garden, a soaker hose might not cover it all and could end up costing more than other drip irrigation systems.
Drip Tape
A lot of small market farmers use drip tape in the beds and the drip tape is connected to polyethylene (plastic) tubing that brings water from the source to the bed. Drip tape is just a thin plastic tube that lays flat when not filled with water. Every few inches (depending on the spacing chosen), there is a small slit in the plastic tube that allows water to drip out. This is what CCUA uses in our production fields and could be very useful to those with large gardens. Check out our video on drip irrigation here!
Installing drip tape is slightly more complex than a soaker hose but, once you get the hang of it, it’s easy peasy! Drip tape also has the added benefit of customization. You can cut the tape to whatever size you’d like. Unfortunately, mice tend to chew through drip tape very easily in search of water to drink. It’s not difficult to repair though! Drip Depot carries all the drip tape supplies you’d need…including pieces to fix chewed up tape! If you know exactly how much you need of the various components, you can order all the pieces individually and it will probably save you a little bit of money.
New to drip tape? We recommend a kit that Drip Depot sells. This will ensure that you have everything you need to get started. They have drip tape kit options in various sizes as well as kits specifically for raised-bed gardens!
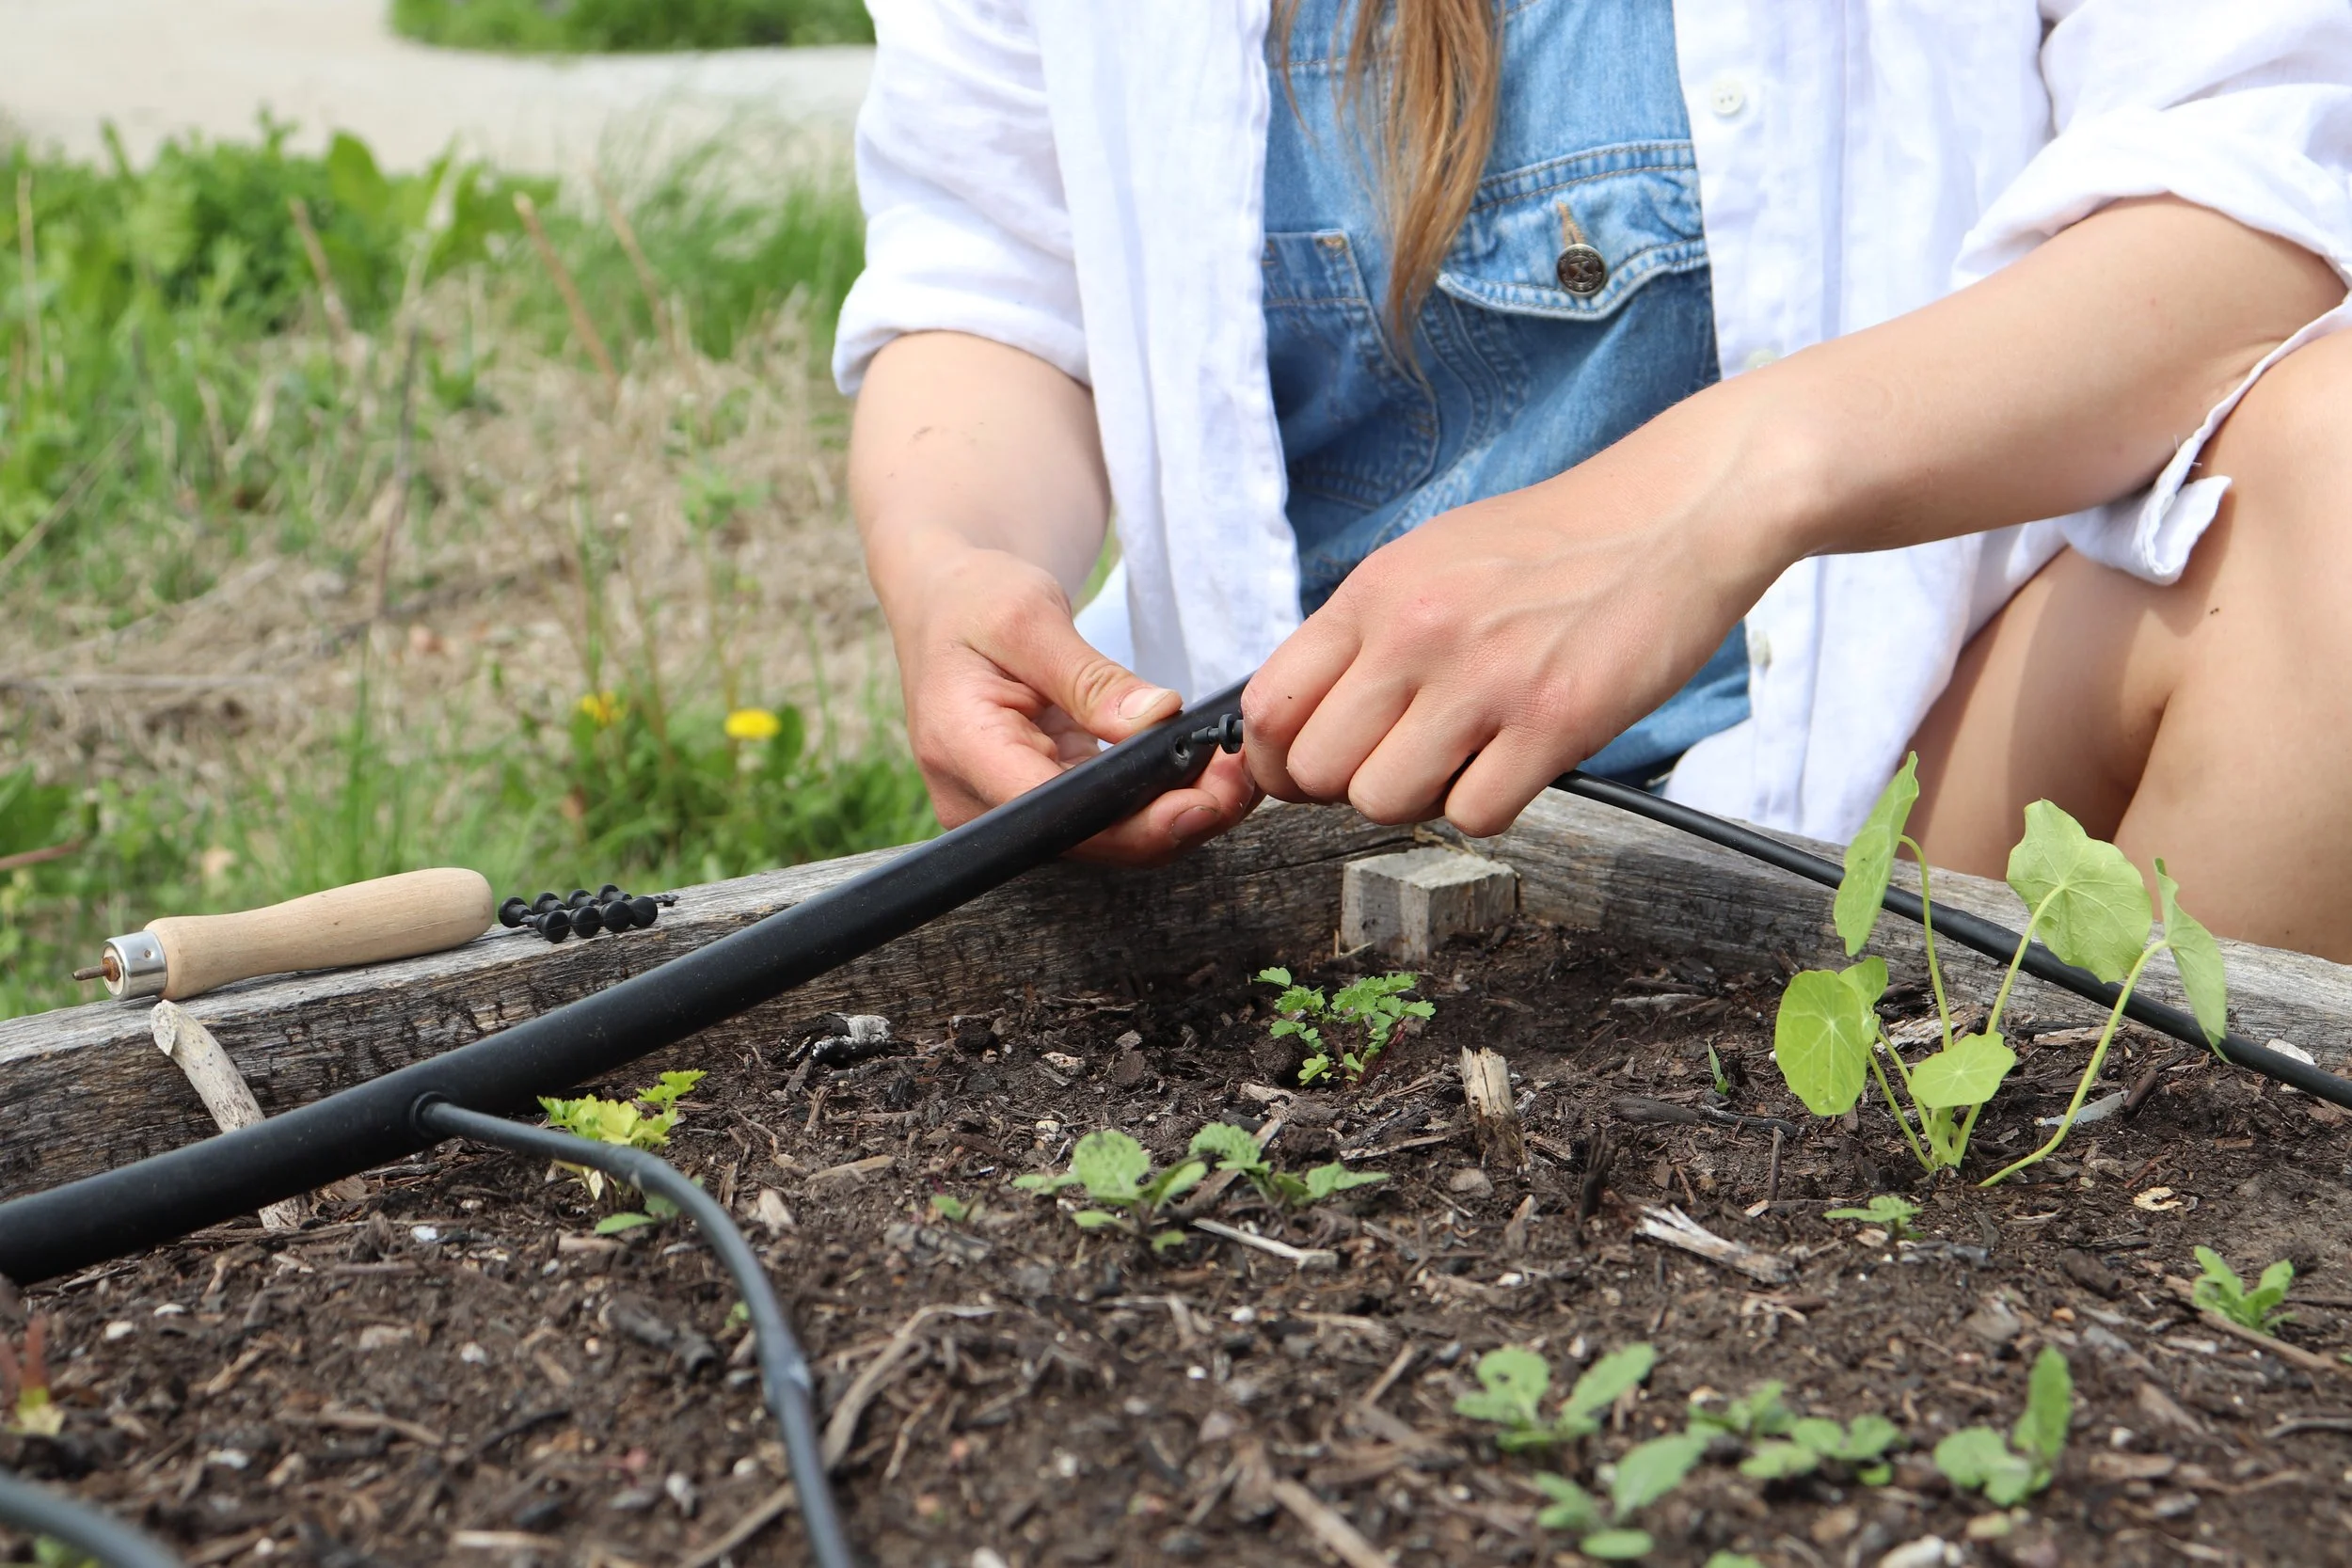
Microtubing
A more mouse proof and potentially easier drip irrigation method for home gardeners is microtubing. Why is it easier for home gardeners? Well, in addition to saving time by not having to fix mouse chewed pieces, you also don’t have to bring any of the components inside for the winter. As long as you disconnect the polyethylene tubing from the water source, you can leave the microtubing coiled up in your garden bed waiting for spring.
Microtubing is very durable! Similar to drip tape, microtubing comes in various drip spacings. Rather than being a slit, microtubing has a hole in an internal emitter every so many inches. Similar to drip tape, it utilizes polyethylene tubing to bring water from the water source to the garden bed; however, instead of having adaptor valves to connect it to the main polyethylene tubing, microtubing connects directly to the mainline. Similar to the drip tape kits, you can purchase microtubing kits from businesses like Drip Works. With this option you can get pretty creative with the valves in order to direct water to different sections of the garden. After all, you only have so much water pressure!
Pressure Regulators
Speaking of water pressure, each of the drip irrigation methods described above (soaker hose, drip tape, & microtubing) can be combined with pressure regulators (sold by both Drip Depot and Drip Works) in order to extend the life of your system. I’d also highly recommend a timer such as the Orbit One-Output. Orbit also sells two-output timers but they can be slightly more complicated to operate. If you don’t need two outputs, the one output would be the best choice. Water filters are also available through Drip Depot and Drip Works.
Testing and Timing
Regardless of whether you’re hand watering, using a sprinkler, or have installed a drip irrigation system, you should repeat the finger test when you think you might be done watering. Oftentimes, when you do the finger test after watering for a while, the top ¼” or ½” of the soil is wet but below that, where the roots are and where the water should be, is dry. If it is dry, be glad that you did the Finger Test! Now you know that you need to water for a longer period of time.
If using a timer, a good starting point would be to set the timer for 30 minutes daily and then add 10-15 minutes if needed. Eventually, you’ll figure out the best duration and frequency for your garden. Frequency can vary though! There might be some weeks with a lot of rain and you can turn the timer off for a few days. This is where your frequent garden visits and habit of checking the weather will come in handy!
Tips!
There are also some gardening strategies that you can utilize along with any of the previously described methods:
It’s best to water early in the morning or later in the evening
Spreading straw or leaf mulch around your garden plants will keep the water in the ground by limiting evaporation from the soil surface. This means your water will actually make it to the plants’ roots and you won’t have to use as much water in your garden!
Utilize Ollas (pots):
Olla” (pronounced OY-ya) is the Spanish word for “pot”. For gardening and agriculture, “olla pot” means any unglazed clay vessel that is buried in garden soil and filled with water to irrigate plants, allowing the pores of the clay to let water seep through the walls into your garden. Check out our tutorial for making one here!
If you don’t have a traditional olla, you can replicate this method by taking an 8-12” unglazed terracotta pot and filling the drainage hole with caulk. It’s important that you use an unglazed pot so that the water can move through the walls of the terracotta pot and into the soil. Finally, don’t forget to put the pot’s saucer on top to cover the water in the pot! It would also be a good idea for those with in-ground beds to hoe their soil up so that the plants are raised above the surrounding path a few inches. This keeps the plant roots from being suffocated by water during periods of intense rainfall.
Unsure what this practice looks like? Stop by Columbia’s Agriculture Park (1769 W Ash St) and take a look at our demonstration gardens. In addition to these strategies, there are tools and materials that will make you a more successful gardener!
Conclusion
When it comes to any garden tool, you often get what you pay for. If your chosen irrigation method requires a garden hose, we recommend you get a heavy duty hose if you can afford it. Although more expensive, in the long run, you’ll save money because the heavy duty hose will last much longer than a light or medium duty hose.
The same concept holds for spray nozzles. The type of spray nozzle that you have to squeeze to turn on is a short-lived garden tool. They’re typically the cheapest option but they have many plastic components that break quickly and then the spray nozzle is useless. When looking at spray nozzles, try to find one that you push a little lever to turn the water on. Bonus points if it’s mostly a solid piece of metal! This Orbit Max 8 is a good example of what we use and would recommend. Spray nozzles with multiple pieces composing the body of the nozzle often start to leak at the seams over time. It’s hard to tell in the picture of the Orbit Max 8 but the grip on the handle is actually rubber adhered to a solid body of metal so it checks all of the boxes! Good supplies will encourage you to garden longer and with less problems!
Overall, irrigation can make or break your gardening experience and outcome. We hope you found some of this information useful for your garden. Please reach out or visit us if you have any more questions! Happy growing!
Note: CCUA only suggests products that we have experience using and are otherwise unaffiliated with any product.